Position Sizing and Risk per Trade: The 1% Rule, Formula, and Examples
Categories Risk Management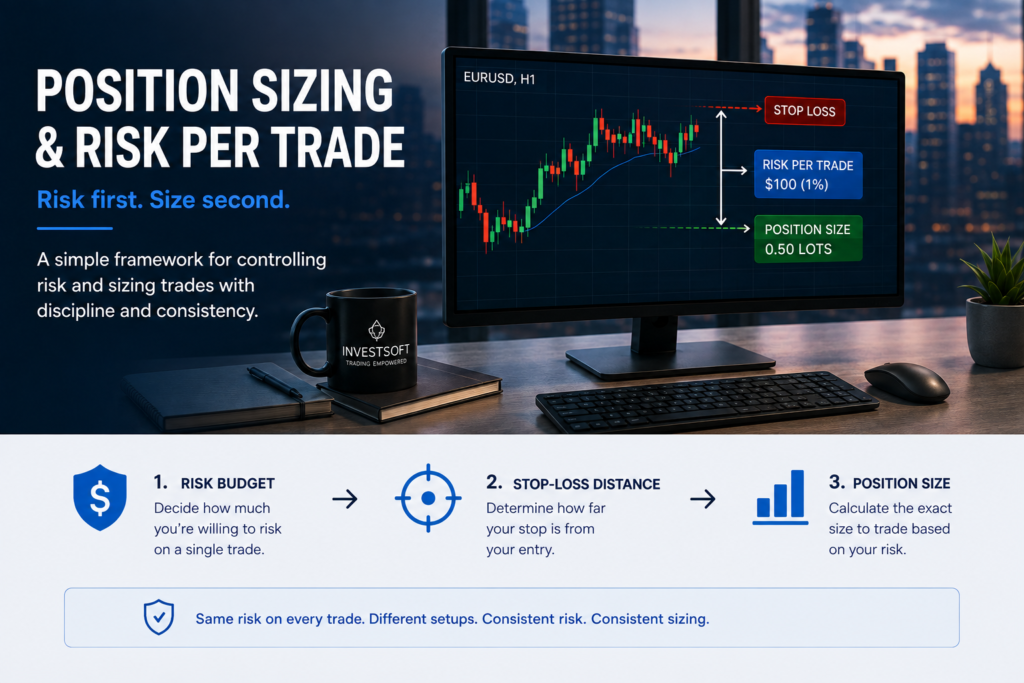
Before you open a trade, two numbers decide how big it should be: how much of your account you’re willing to lose if the stop is hit, and how far away that stop actually is. Position sizing is the calculation that turns those two numbers into a tradeable size, whether that’s shares, units or lots.
Get the order wrong, picking a lot size first and squeezing the stop to fit it, and the risk you actually take stops matching the risk you planned. Get it right, and every trade risks the same, deliberately chosen amount regardless of the setup, the instrument, or how wide the stop needs to be.
This article walks through that calculation: how to choose risk per trade, how stop-loss distance enters the formula, and how to go from those two inputs to an exact position size, whether in shares, in Forex lots, or inside InvestSoft Trade Manager.
Position Sizing vs. Risk per Trade: What’s the Difference?
The two terms get used almost interchangeably, but they answer different questions.
Risk per Trade (RpT) is how much of your account you are willing to lose if a specific trade hits its stop loss. Traders usually state it as a percentage of the account, then convert that into money: a $10,000 account with 1% risk per trade means you’ve decided, before entering, that no single trade will cost you more than $100.
Position Size is the answer to a follow-up question: given that $100 budget and a specific stop-loss distance, how many shares, units, or lots can you actually trade? Risk per trade sets the ceiling. Position size is the number that keeps you under it.
The two are connected, not identical. You can risk 1% on a trade with a tight stop and end up with a large position, or risk the same 1% on a trade with a wide stop and end up with a small one. The percentage doesn’t change. The size does.
How Much Should You Risk per Trade?
The 1% Rule
The most commonly cited reference point is to risk about 1% of account balance on a single trade. On a $10,000 account, that’s $100 at risk if the stop is hit, not the value of the position, just the amount you stand to lose.
The appeal of 1% is straightforward: a string of losses, even a bad one, stays survivable. Five consecutive 1% losses reduce the account by about 4.9%, because each 1% loss is applied to the remaining balance. That’s not enough to force a trader out of the game or into a psychologically difficult recovery.
What About 2% Risk?
2% per trade is the other figure that comes up repeatedly. It doubles the impact of both wins and losses relative to 1%, which means faster account growth when a strategy is working, and faster drawdowns when it isn’t.
The difference compounds with consecutive losses. Because each loss is taken as a percentage of whatever capital remains, five losing trades in a row don’t simply add up five times. They compound:
| Risk per trade | 5 consecutive losses | Remaining capital |
|---|---|---|
| 1% | ≈4.9% drawdown | ≈95.1% |
| 2% | ≈9.6% drawdown | ≈90.4% |
The exact relationship is Drawdown% = 1 − (1 − Risk%)^N, where N is the number of consecutive losses. At low risk percentages the difference from simple multiplication (Risk% × N) is small, but it grows as risk per trade increases, which matters if you’re doing this arithmetic by hand.
Recovering from a drawdown also gets harder faster than the loss itself suggests: a 10% loss needs an 11.1% gain to break even, but a 40% loss needs a 66.7% gain. Risk per trade is one of the main levers that determines how deep that hole can get.
Is 1–2% a Universal Rule?
No, and the disagreement here is real, not cosmetic. Several independent traders and educators recommend figures in the roughly 1–3% range as a general starting point. But that range is not unanimous. At least one experienced CTA-level trader explicitly rejects 2% risk per trade as “the wrong way,” recommending closer to 0.25% instead, on the basis that smaller, more frequent losses are easier to trade through without emotional interference. Scalpers working with very tight, tick-based stops have been documented using similarly low risk percentages (around 0.25–0.5%) for a different reason. Their stop distances are small enough that even a conservative risk percentage still produces a workable position size.
There is no single number that fits every strategy, account size, or psychological tolerance for loss. What matters more than the exact figure is picking one deliberately, in advance, and applying it consistently, rather than deciding trade-by-trade based on how confident a setup feels.
The Position Sizing Formula
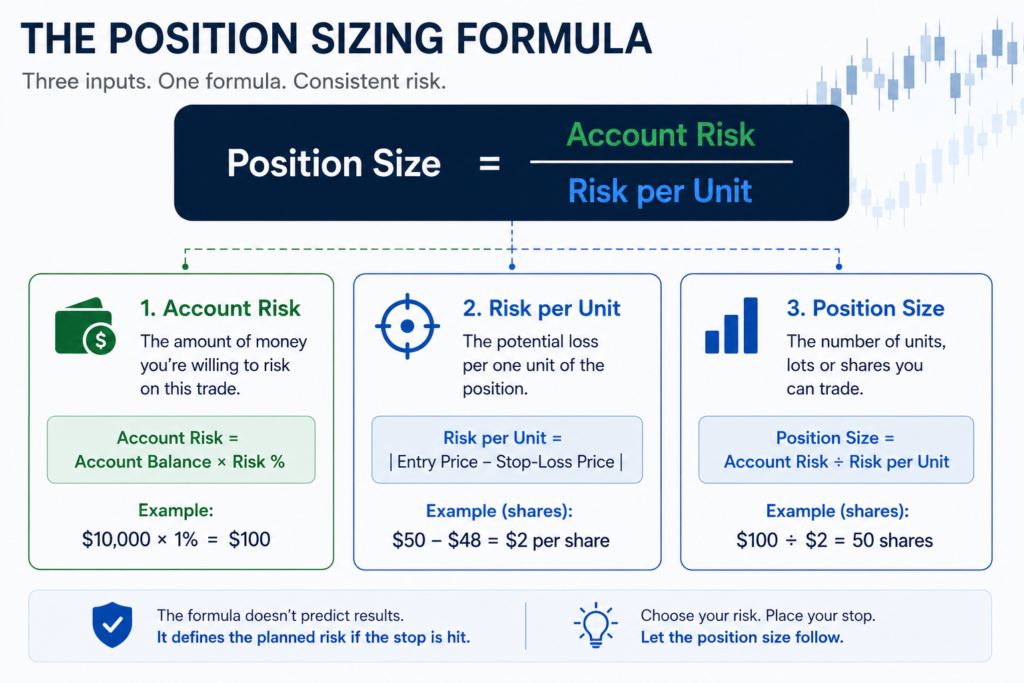
Once a risk percentage is chosen, turning it into an actual position size is a three-step calculation.
Step 1: Calculate Account Risk
Account Risk = Account Balance × Risk %
This converts the percentage into a concrete amount of money. A $10,000 account risking 1% has an Account Risk of $100 on the trade, the maximum you’re planning to lose if the stop is hit.
Account balance and account equity are not the same thing, and this article uses balance as the default sizing basis, matching the formula above. Trade Manager exposes both as separate, independently configurable settings called Risk Balance and Risk Equity, so which one a position is sized from is a deliberate choice, not a detail to gloss over.
Step 2: Calculate Risk per Unit
Risk per Unit = |Entry Price − Stop-Loss Price|
This is the distance, in price terms, between where you get in and where you’ve decided you’re wrong. For a stock bought at $50 with a stop at $48, the risk per unit is $2. You lose $2 for every share you hold if the stop is hit.
Step 3: Calculate Position Size
Position Size = Account Risk ÷ Risk per Unit
Dividing the money you’re willing to lose by what each unit risks tells you how many units you can hold without exceeding your planned loss.
This formula, risk amount divided by the per-unit risk implied by the stop, is the standard, widely used approach to risk-based position sizing across both stocks and Forex. It’s the same underlying mechanism whether the output is described in shares, units, or lots.
Position Sizing Example: 1% Risk on EURUSD
Here’s the calculation worked through end to end, using the same three-step formula, applied to a Forex trade.
In Forex, position size is measured in lots rather than shares, and the “risk per unit” step becomes pip value instead of raw price distance. For an instrument quoted directly in your account currency, the formula is:
Lots = Account Risk ÷ (Stop-Loss Distance in pips × Value per Pip per Standard Lot)
| Step | Value |
|---|---|
| Account balance | $10,000 |
| Risk per trade | 1% |
| Account Risk | $10,000 × 1% = $100 |
| Instrument | EURUSD |
| Stop-loss distance | 20 pips |
| Value per pip (standard lot) | $10 |
| Position size | $100 ÷ (20 × $10) = 0.5 standard lots |
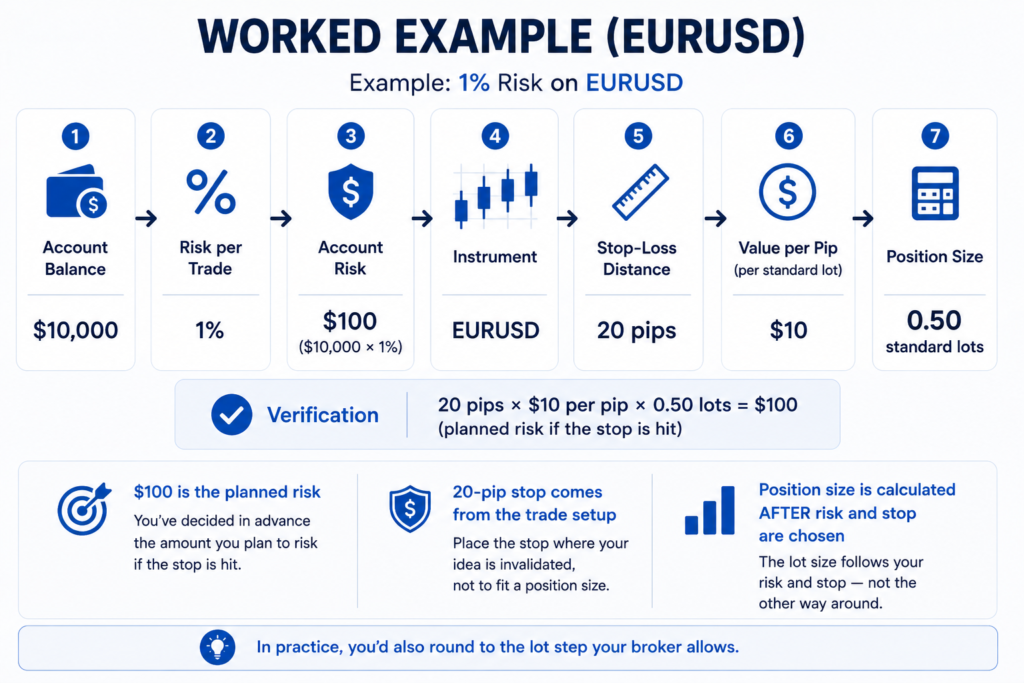
$100 here is the planned risk, not the size of the position, so it’s what you stand to lose if the stop is hit, not what you’re putting into the trade. The 20-pip stop comes from the trade setup, not from a target lot size. 0.5 lots is the position size that falls out of those two numbers, decided only after the risk and the stop were already chosen.
Run the check the other way: 20 pips × $10 per pip × 0.5 lots = $100. That matches the Account Risk exactly, confirming the position stays inside the budget set at the start.
This $10-per-pip figure applies to EURUSD in a USD-denominated account, where one standard lot (100,000 units) moves approximately $10 per pip. Other pairs, account currencies and instruments use different pip or point values. That complexity is covered in the Forex/CFD section below. In practice, you’d also round to the lot step your broker allows.
Why Stop-Loss Distance Changes Position Size
The formula makes one relationship unavoidable: for a fixed amount of money at risk, a wider stop means a smaller position, and a tighter stop means a larger one.
Take the same $100 risk budget and the same EURUSD $10-per-pip value, and change only the stop distance:
| Stop-loss distance | Position size (at $100 risk) |
|---|---|
| 10 pips (tight) | 1.00 lot |
| 20 pips | 0.50 lot |
| 40 pips (wide) | 0.25 lot |
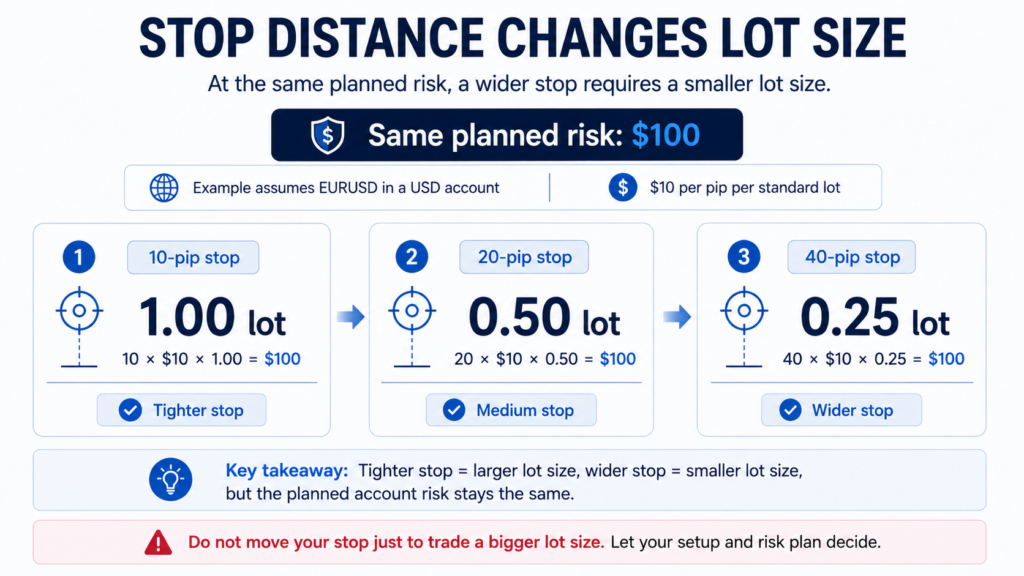
Each row checks out against the same formula: 10 × $10 × 1.00 = $100, 20 × $10 × 0.50 = $100, 40 × $10 × 0.25 = $100. None of these trades risk more or less than the other. All three are sized for the same $100 planned risk if the stop is hit. What changes is how large a position that risk allows.
Stop placement should come from the trade itself, from where the setup is genuinely invalidated, not from a desire to fit a particular position size. Moving a stop closer just to unlock a larger lot size means the stop no longer reflects where the trade idea actually fails. It’s now sized to a number instead of to the chart. The formula only works in one direction: choose the risk, place the stop where the setup calls for it, and let the position size fall out of those two decisions, not the other way around.
Position Sizing in Forex, Gold, Indices and MetaTrader
The EURUSD example above works cleanly because a pair quoted directly in your account currency, at the standard 100,000-unit lot size, has a fixed, well-defined pip value. That’s what let $100 risk and a 20-pip stop resolve directly to 0.5 lots using Lots = Account Risk ÷ (Stop-Loss Distance in pips × Value per Pip per Standard Lot).
Other Forex and CFD instruments complicate that mapping. A pip or point of movement isn’t worth a fixed, universal dollar amount. Its value depends on the instrument, the position size itself (lot size), and, for cross-currency pairs, the exchange rate between the instrument’s quote currency and your account currency.
Where this gets genuinely more complex is everywhere the instrument isn’t quoted directly in your account currency, or doesn’t use the standard 100,000-unit lot convention. Cross-currency pairs, many indices, metals and CFD contracts define pip value and contract size differently by broker and symbol. The research behind this article does not include a verified worked example covering cross-currency conversion, index point values, or metals contract specifications, so this article does not attempt to teach those calculations from general knowledge. If you’re sizing a position on an instrument where pip or point value isn’t obvious from your platform, check your broker’s contract specification for that symbol before relying on a manual calculation.
Position Sizing Example in MetaTrader
Applying the same three-step process inside MetaTrader looks like this conceptually:
- Decide account risk, for example 1% of a $10,000 account = $100.
- Set the stop-loss distance based on the trade setup, for example 20 pips on EURUSD.
- Convert that distance into monetary risk per lot using the instrument’s pip value, then divide account risk by that figure to get the lot size, 0.5 lots in the example above.
For instruments such as Forex, metals and indices, position sizing can require symbol-specific inputs such as tick value, pip value or contract specifications, which makes the calculation less direct than a flat price-distance calculation on a stock. Working through it manually still means looking up the right pip or tick value, doing the division, and rounding to the broker’s lot step. Where InvestSoft Trade Manager fits in is automating exactly that lookup-and-division step, covered next.
How Trade Manager Automates Risk-Based Position Sizing
The calculation above, risk amount divided by stop-loss distance, is mechanical and repetitive once you already know your risk percentage and where your stop belongs. InvestSoft Trade Manager, an Expert Advisor for MT4 and MT5, automates that specific step through its Lot Size / Position Size Calculator functionality.
Trade Manager can calculate lot size automatically from a chosen risk basis:
- Cash Amount: a fixed monetary risk per trade,
- Risk Balance: a percentage of account balance,
- Risk Equity: a percentage of current account equity.
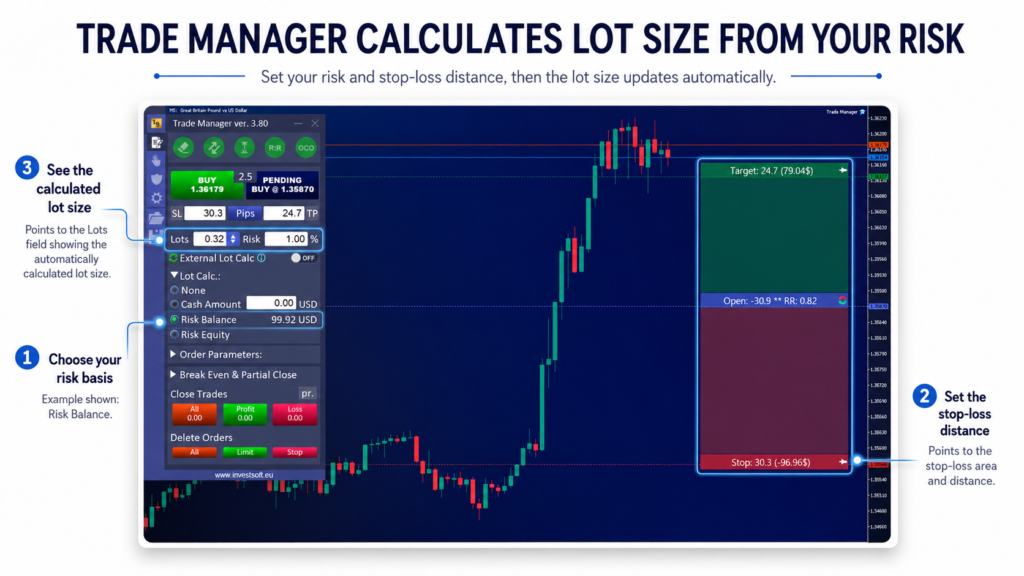
The calculated lot size updates live as the Stop Loss is placed or dragged on the chart, so moving the stop automatically recalculates the position size needed to keep risk at the chosen level. That’s the same “work backward from the stop” sequence the formula above is built on, just handled automatically instead of left to manual recalculation.
Two details worth knowing before relying on it:
- Trade Manager can factor in commission through its commission setting and spread through the configurable Spread Multiplier when sizing the position. Those are costs the manual pip-based formula above doesn’t account for on its own.
- A maximum-acceptable-risk percentage can be configured, and the risk display is highlighted when that threshold is exceeded. This is a visual warning: the product documentation does not confirm that it blocks the trade from being opened.
What Trade Manager does not do: it doesn’t decide where your stop should go, and it doesn’t decide what risk percentage is appropriate for your account or strategy. Both of those remain trading decisions. Automating the size calculation removes a repetitive, error-prone manual step. It doesn’t create an edge, and a correctly sized position on a losing strategy is still a losing strategy.
Position sizing controls how much you risk on each trade. Whether the strategy itself has a positive expectancy depends on the relationship between its win rate, average winner and average loser, covered in our guide to risk-to-reward ratio, win rate and trading expectancy.
Other Position Sizing Methods
The Account Risk ÷ Risk per Unit formula covers most retail position sizing, but there are two other bases traders use to define “Account Risk” in the first place, plus one volatility-based variation on stop placement.
Fixed Percentage
This is the method used throughout this article: risk a consistent percentage of account balance on every trade. Because it’s a percentage rather than a fixed sum, the dollar amount at risk scales automatically as the account grows or shrinks. A $10,000 account risking 1% risks $100. The same account at $12,000 risks $120, without the trader having to change anything. This also means that after a losing streak, the dollar risk per trade shrinks along with the account, which slows the rate of further loss but also slows recovery, since a smaller position needs more winning trades to rebuild the same dollar amount.
Fixed Dollar Risk
Instead of a percentage, some traders risk a flat dollar amount per trade, for example always $100, regardless of account size. This is simpler to apply consistently, but the percentage of the account that $100 represents changes as the account balance changes: on a $10,000 account it’s 1%, but if the account grows to $20,000, the same $100 is now only 0.5% of capital, and if it shrinks to $5,000, it’s become 2%. Neither fixed-percentage nor fixed-dollar sizing is inherently wrong. They’re different answers to the same question, with different behavior as the account balance moves.
ATR / Volatility-Based Sizing
Average True Range (ATR) measures how much an instrument typically moves over a given period. Here, it informs stop-loss distance rather than acting as a separate position-sizing formula. A wider ATR generally justifies a wider stop, since a tight stop on a naturally volatile instrument is more likely to be hit by normal price movement rather than by the trade idea actually failing.
Once the ATR-based stop distance is set, the same Account Risk ÷ Risk per Unit calculation applies exactly as before. ATR changes the stop distance input, not the sizing formula itself. Trade Manager supports ATR-based default stop distances and an ATR-based trailing stop mode, both of which feed into position sizing the same way any other stop distance does.
Common Position Sizing Mistakes
- Choosing the position size first and forcing the stop to fit. This inverts the formula. The stop should come from the trade setup, and the position size should be derived from it, not the reverse.
- Letting risk per trade drift. Risking 0.5% on one trade and 3% on the next, based on how confident a setup feels, defeats the purpose of having a risk rule in the first place.
- Forgetting that different stop distances need different position sizes. A lot size or share count that was correct for a tight-stop trade will over-risk a wide-stop trade at the same size.
- Treating planned risk as realized risk. The formula assumes the stop is filled exactly where it’s placed. Spread, slippage and commission can all push the actual loss slightly beyond the planned amount, a difference worth accounting for when the gap matters and one the basic formula on its own does not.
- Applying the same lot size across instruments without checking contract specifications. A lot size that produces a sensible risk on one instrument can represent a very different amount of risk on another, since pip value, tick value and contract size aren’t uniform across symbols.
A Practical Position Sizing Checklist
- Define your account risk: pick a percentage (or fixed amount) you’re prepared to apply consistently.
- Place a stop based on where the trade setup is actually invalidated.
- Calculate the risk per unit, pip, or point for that specific stop distance.
- Divide account risk by risk per unit to get the position size.
- Round down, and confirm the resulting position doesn’t exceed your planned risk.
- If the stop moves before or after entry, recalculate the size. Don’t leave the old size in place with a new stop.
- Track what a trade actually lost against what you’d planned to lose, so spread, slippage and rounding don’t quietly become a bigger factor than expected.
Final Takeaway
Risk per trade defines the budget: how much of the account you’re prepared to lose if a single trade fails. Stop-loss distance defines how much each unit of the position risks. Position sizing is the calculation that connects the two. It’s nothing more mysterious than Account Risk divided by Risk per Unit.
There is no single risk percentage or position-sizing method that is correct for every trader, account, or strategy. The goal isn’t to find one universally right number. It’s to choose a risk per trade deliberately, place stops based on the trade setup rather than the desired position size, and keep the resulting position consistently sized to the risk you actually decided to take, trade after trade, not just when it’s convenient to check.
